
This project creates a flat bear-shaped holder that measures about
16.5 cm long and 10 cm wide (around 6.5 by 4 inches).
It’s designed so your glasses slide gently into the center and stay put without bending or scratching.
This tutorial is written for:
People who need to see the steps in their head to understand them
People who are new to crochet
People who get nervous reading patterns
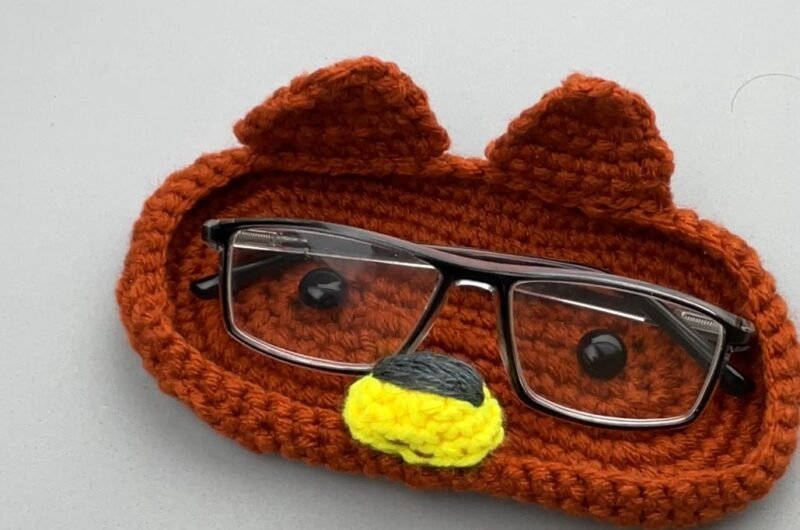
Cute Bear Glasses Holder
Pattern Type: Glasses holderStyle: Home decorSkill Level: Beginner-friendlyBefore You Start (Teacher Talk ) :
Before we touch the hook, here’s something important:
This pattern does NOT depend on exact tension or exact yarn brand.
So if your piece looks slightly bigger or smaller — it is still correct.
Materials
Medium-thickness yarn
A medium crochet hook (around 5 mm)
Scissors
A short piece of black yarn (for eyes and nose)
Pattern Instructions
- Make the Starting Chain (17 loops)
1: Make a starting loop and place it on your hook.
2: Pull the yarn through the loop 17 times, creating 17 chain loops.
What you should see:
- A neat row of little “V” shapes
- It should be about 9–10 cm long - Begin the Oval (First Side)
1: Skip the very first loop closest to your hook.
2: In the second loop, place two stitches
(this helps the oval curve instead of staying straight).
3: Place one stitch into each loop until you reach the last loop.
4: In the last loop, place three stitches.
What you should see now:
- One end looks rounded
- The other end is still straight - Crochet Along the Other Side of the Chain
1: Without turning your work, continue crocheting along the other side of the chain.
2: Place one stitch into each loop as you go back.
3: When you reach the first stitch you made, connect the round to close the oval.
Now count gently:
- You should have 34 stitches around the whole shape
If you have one or two more or less — it’s okay. The shape matters more than the number. - Make the Oval Bigger (Second Round)
In this round, we slowly widen the oval.
- Near the curved ends, you will place two stitches in the same spot
- Along the long sides, you place one stitch per spot
This balance keeps the shape smooth.
What to watch for:
- The oval should lie flat on the table
- No curling, no ruffling - Continue Expanding the Shape
Over the next few rounds, you will repeat the same idea:
- Add extra stitches only at the curves
- Keep the sides straight
- Go slowly and calmly
By now, your piece should be about:
- 14–16 cm long
- Clearly oval - Final Smoothing Rounds
Now crochet three full rounds where:
- You place one stitch into each stitch
- No extra stitches are added
This gives the holder strength so it doesn’t collapse under the glasses.
At the end:
1: Cut the yarn
2: Pull it through the last loop
3: Gently tighten to secure - Making the Ears (2 Small Circles)
- Each ear is about 3–4 cm wide.
How the Ear Is Made
1. Make a small adjustable loop.
2. Crochet five stitches into the center.
3. Pull the yarn tail to close the circle.
In the next round, place two stitches into each stitch.
You’ll end with:
- A small, puffy circle
- Leave a long yarn tail for sewing
Make two identical ears. - Making the Nose
- The nose is a small circle, about 2.5 cm wide.
1. Make a small circle the same way as before.
2. Add one gentle round to smooth it.
3. Cut yarn and secure.
Using black yarn:
- Stitch a small triangle
- Add a short vertical line below it
This gives the bear its expression. - Assembly (Bring Bear to Life )
- 1. Sew two small black eyes onto the face
Place them evenly, left and right, near the center.
2. Sew the nose below the eyes, centered.
3. Attach the ears along the top edge, spaced evenly.
4. Weave in all loose yarn ends.
Final step:
- Slide your glasses gently into the center.
They should rest snugly without falling.
Tips
- If something looks uneven: that’s handmade beauty
If sewing feels hard: go slow, one stitch at a time
If you make a mistake: yarn forgives you
Every crochet project teaches your hands something new.
Friendly
If you’re reading this with a finished bear in front of you —
I’m proud of you.
You followed a real project.
You trusted your hands.
And now your glasses have a cozy little guardian.